A recipe for one-pan oven-baked pancake
I have a gluten-free oven-baked pancake recipe for you! This started off as an attempt to create a classic Dutch baby pancake. My goal was to use my gluten-free flour blend, and the first few experiments did not disappoint—they puffed up beautifully, with that dramatic, lofty rise that makes Dutch babies such a showstopper. The edges were crispy, and the center had a light, airy texture, like a cross between a thick pancake and a thin crepe.
But here’s the thing: when I bake pancakes for weekend breakfasts or brunch, I prefer something with a bit more substance—a satisfying bite that feels closer to regular pancakes but with the convenience of baking it all at once. No flipping, no fuss, just one pan to serve my family.
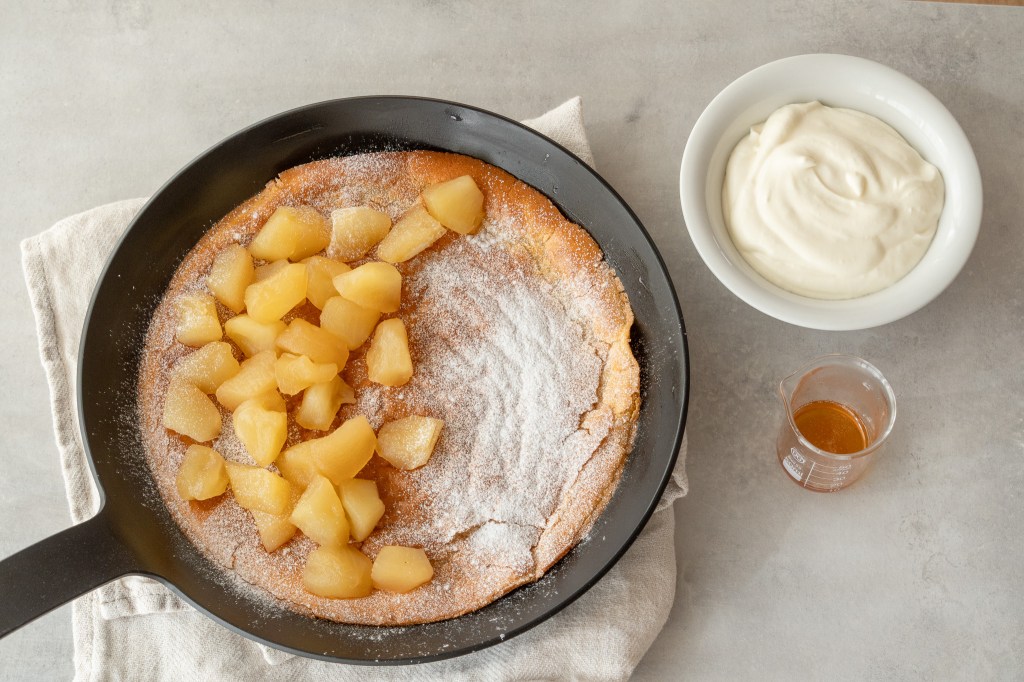
So, I kept experimenting and found that pouring the batter into a buttered cold pan and placing it in a cold oven was the way to go. The batter sets slowly as the pan and oven heat up, only puffing up slightly in the last 10 minutes of baking. This method creates a perfectly golden top with baked-custard like center, keeping the pancake satisfyingly substantial.
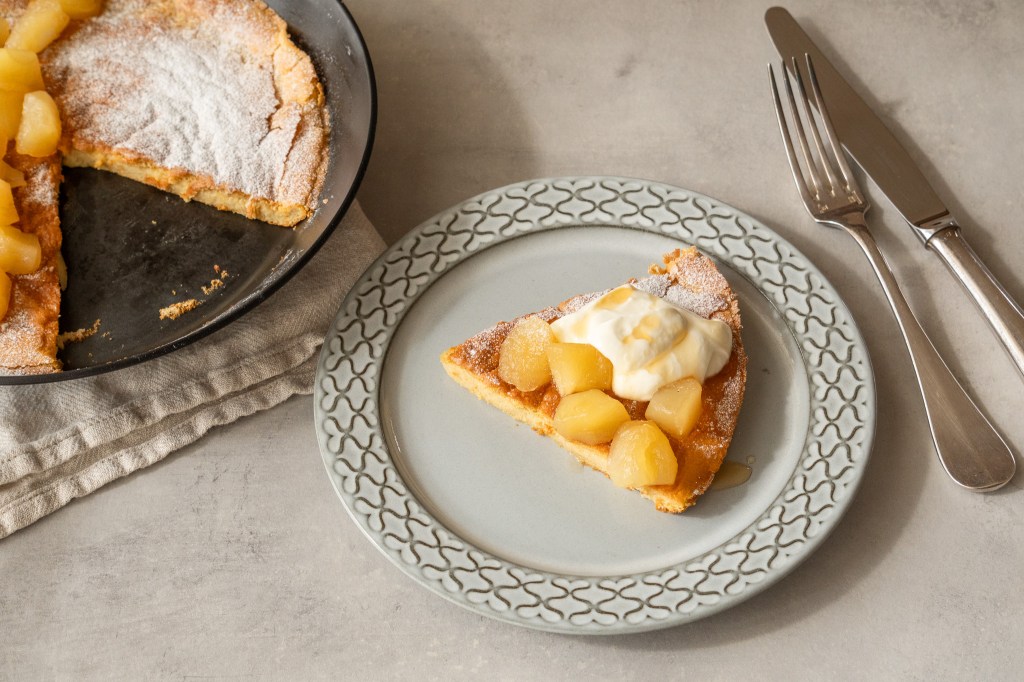
When it comes to toppings, I prefer not to use cream on a hot pancake, as it tends to melt back into liquid, undoing all the effort of whipping. Instead, I wait till the pancake is served in wedges, and top it with cream of all sorts. I also recommend pairing this pancake with fruits that complement its texture: ripe bananas, stewed apples, or macerated berries are my top picks. You can also make this into a savory pancake with sautéed mushrooms, bacon and hard cheese.
Tools I Used:
26cm cast iron skillet by Meyer: This pan is fantastic! It has all the durability, heat retention, and ease of care of traditional cast iron, but with a modern lightness and sleek design that’s perfect for cozy dining at home. If you don’t own a skillet, any oven-safe pan or shallow dish will work—just be sure to butter it well.
A handheld blender or a whisk
A mixing container suitable for a handheld blender
Ingredients: makes enough batter for 26cm diameter skillet
3 whole eggs
15g sugar
10g melted butter (cooled)
50g gluten-free flour blend, shifted (brown rice flour, almond flour, potato starch, alpha-rized rice flour in a ratio of 10:5:4:1)
⅛ tsp nutmeg
pinch of salt
110ml milk
Unsalted butter (for greasing the skillet)
Powdered sugar (as needed)
Instructions:
1.Grease a cold 26cm skillet with unsalted butter.
2.Add eggs, sugar and melted butter in a blender or blender safe container. Mix well until combined. Add the flour mixture, nutmeg and salt and blend until smooth.
3. Slowly add milk and blend well. Finish off mixing with a handheld whisk to ensure even consistency.
4.Pour into the prepared skillet and place it in the cold oven.
5.Bake at 180°C for about 30 minutes. Halfway through, rotate the skillet to ensure even baking.
6.Once it has risen nicely and has a beautiful golden color, remove from the oven.
7.Let it rest for about 5 minutes until it settles down, then dust with powdered sugar.
Serve with your favorite cream or fruits.

オーブンで焼くスキレットパンケーキ
パンケーキを焼く時の一番のハードルは、一度に何枚も焼けないこと。ホットプレートがあれば別ですが、フライパンで焼くとなると、思いのほか手間がかかりますね。気持ちもゆったりな週末朝「さあ今日はパンケーキ!」と張り切って作りだすものの、家族を待たせることになって後悔したことが何度もあります。
今回ご紹介するのは、4-5人分ほどの生地を一度にスキレットで焼くパンケーキです。横着しているわけではありません。もとのアイディアはダッチベイビーパンケーキから。スキレットに生地を流してオーブンで焼く、大きくてインパクトのあるパンケーキです。召し上がったことはありますか?
最初は、玄米粉を配合したグルテンフリーミックス粉を使ってダッチベイビーの試作をしていました。種明かしをすると、定番のダッチベイビーパンケーキを作りたい方は、一般的なレシピを小麦からお好みのグルテンフリー粉に変えれば作れます。側面がぷくっと持ち上がり、薄さと軽さが特徴で、カフェ風のおしゃれな盛り付けにもぴったり。
でも今回目指したのは、ダッチベイビーの見た目ではなく、食事になるような食べ応えと、しっとり感のあるパンケーキでした。本来は熱々のスキレットに生地を入れ、高温のオーブンで一気に焼き上げます。色々と試した結果、理想の食感になったのは冷たいフライパンに生地を流し込み、予熱なしのオーブンで焼く方法でした。じっくり火を通すので膨らみは控えめです。そのかわり、しっとり感が長持ちし、美味しそうな焼き色もつく。スライスして冷蔵保存も可能。食べる前に温め直せば美味しさが復活します。
本来のダッチベイビーとは離れてしまったので「オーブンで焼くスキレットパンケーキ」と呼ぶことにしました。
泡立てた生クリームやシロップ、チーズクリームやヨーグルトクリームなど、お好みのものを添えてどうぞ。フルーツを添えるなら、バナナや甘く煮たりんご、砂糖をまぶして少し置いたベリー類がおすすめ。チーズやベーコン、きのこソテーなどの食事系も実はとってもよく合います。ぜひお試しください。
使用した道具
- 26cm 鉄フライパン:私はMEYERのIRON PANを使用。従来の鉄フライパンの魅力を持ちながら、スタイリッシュで軽い。普段の食卓にもぴったり。もし鉄フライパンをお持ちでなければ、オーブン対応のフライパンや耐熱皿でもOK。
- ブレンダー、ハンドブレンダー、もしくは泡立て器
【レシピ】オーブンで焼くスキレットパンケーキ
26cm の鉄スキレット1台分
卵3個
砂糖15g
溶かしバター(溶かして冷ましたもの)10g
グルテンフリーミックス粉 50g (玄米粉・アーモンドパウダー・片栗粉・α化米粉 10:5:4:1)
ナツメグ・塩 それぞれ少々
牛乳110ml
フライパン用無塩バター 適量
粉砂糖 適量
1. 冷たいスキレットに無塩バターを塗っておく。ミックス粉はふるっておく。
2. ブレンダーが入る容器に卵を割り入れ、砂糖と溶かしバターを加えて混ぜ合わせる。ミックス粉、ナツメグ、塩も加えてなめらかになるまでブレンダーを回す。
3. 牛乳をゆっくり加えて混ぜ合わせる。泡立てすぎないこと。混ぜ残りがないように最後は泡立て器で仕上げると良い。
4. 用意したスキレットに生地を流し込み、予熱をしていないオーブンに入れる。
5. 180℃で約30分、途中一度スキレットの向きをかえて、まんべんなく火を入れる。きれいな焼き色がつくまで焼く。
6. オーブンから出し、全体にしぼんで落ち着いたら(約5分)粉砂糖をまぶす。
7. 切り分けて、好みのクリームやフルーツを添えてどうぞ
Got questions or feedback?
ご質問やご感想はこちらからお送りください。


